This post is created in response to various people on the internet trying to/suggesting others to put two fans in series in order to power them from a higher voltage power supply.
In short, don't.

Showing posts with label guide. Show all posts
Showing posts with label guide. Show all posts
Thursday, June 7, 2012

Saturday, March 17, 2012
Obvious over-rating is obvious
I was looking at 12V "industrial"-type power supplies, may be useful for mITX builds.
There was one being sold rather cheaply for its output power.
12V, 10A.
However,
Input current: 1.1A @ 115V
Hey... that's only 126.5VA.
I can let it have 99% power factor, possible in this day and age of active PFC, but over 90% efficiency for an AC to DC power supply so cheap? Not likely.
So this thing is obviously incapable of sustaining 120W continuous.
If you observe, a good power supply's (input voltage x current) in VA (volt-amps) is much bigger than its rated maximum output power in watts, in some cases more than twice as much. So this can be a good way to see if the company is padding their ratings.
There was one being sold rather cheaply for its output power.
12V, 10A.
However,
Input current: 1.1A @ 115V
Hey... that's only 126.5VA.
I can let it have 99% power factor, possible in this day and age of active PFC, but over 90% efficiency for an AC to DC power supply so cheap? Not likely.
So this thing is obviously incapable of sustaining 120W continuous.
If you observe, a good power supply's (input voltage x current) in VA (volt-amps) is much bigger than its rated maximum output power in watts, in some cases more than twice as much. So this can be a good way to see if the company is padding their ratings.
Friday, October 28, 2011
How to avoid buying fake or overpriced products
The audiophile market is filled with unscrupulous sellers, people who take something worth very little and sell it for a lot more than it should be.
This happens in some industries (not just audio) because it is very difficult to verify the product's performance. You can't tell if that that hair-growth formula really works, if that toothpaste really whitens, if that weight-loss pill is not poison, or if this exercise machine is not actually a... wtf.
A seller can simply take a mediocre component, relabel it as something that costs more, and sell it to unsuspecting buyers who are too (insert adjective here) to verify its authenticity. Or he can put a high price tag on a worthless design and sell it to unsuspecting buyers who are too (insert adjective here) to verify its performance. Or, the seller claims he "made improvements" to the original design and sells it for twice as much.
Fortunately, there is a way around this.
This happens in some industries (not just audio) because it is very difficult to verify the product's performance. You can't tell if that that hair-growth formula really works, if that toothpaste really whitens, if that weight-loss pill is not poison, or if this exercise machine is not actually a... wtf.
A seller can simply take a mediocre component, relabel it as something that costs more, and sell it to unsuspecting buyers who are too (insert adjective here) to verify its authenticity. Or he can put a high price tag on a worthless design and sell it to unsuspecting buyers who are too (insert adjective here) to verify its performance. Or, the seller claims he "made improvements" to the original design and sells it for twice as much.
Fortunately, there is a way around this.
Tuesday, October 11, 2011
Amplifier output power vesus load impedance
Amplifiers have their own rated output powers. Typically consumer products only show one set of numbers, for example, 30W @ 8 ohm.
This often leads to confusion when speakers of impedances other than 8 ohm are used. Statements like: "4 (or 8) ohms gives more power", and "2 (or 16) ohms will spoil the amplifier".
The correct answer would be: it depends.
This often leads to confusion when speakers of impedances other than 8 ohm are used. Statements like: "4 (or 8) ohms gives more power", and "2 (or 16) ohms will spoil the amplifier".
The correct answer would be: it depends.
Friday, July 1, 2011
Getting the power indicator LED(s) working on Muse M20 EX3
At first I was cursing about how the Muse M20 EX3 does not have a power indicator LED. Turns out I was wrong.
There is, but it is so faint, it might as well don't be there.
I only noticed it because I saw a faint blue glow coming from the bottom side of the volume knob when the room is dark. In fact, even with the lights off, the light is so dim it cannot be captured on my camera.
So there is light behind the knob. So I pulled the knob out.
Four LEDs do the job of lighting up the blue glow.

But the light is blocked by the knob which is too fitting.
So pull the knob out until you get the amount of light you want.

How it should look like.
I don't know if this is a design flaw, problem during transport, or intentional. But easily adjustable power LED indicator is useful for me. You know how the newer monitors can set the power indicator light to off, so that you can enjoy the movie in total darkness?
There is, but it is so faint, it might as well don't be there.
I only noticed it because I saw a faint blue glow coming from the bottom side of the volume knob when the room is dark. In fact, even with the lights off, the light is so dim it cannot be captured on my camera.
So there is light behind the knob. So I pulled the knob out.
Four LEDs do the job of lighting up the blue glow.

But the light is blocked by the knob which is too fitting.
So pull the knob out until you get the amount of light you want.

How it should look like.
I don't know if this is a design flaw, problem during transport, or intentional. But easily adjustable power LED indicator is useful for me. You know how the newer monitors can set the power indicator light to off, so that you can enjoy the movie in total darkness?
Monday, June 6, 2011
Improve your ATi / AMD graphics card's video playback quality by DISABLING all the enhancements
It happened one day (a long time ago actually), I acquired Nanatsuiro Drop's DVD creditless opening video, so when I got home I played it on my main PC with a HD5670 and SyncMaster 913V.
What I saw, was a putrid mush of ****.
It should be noted, at that point in time, my 913V was not calibrated. But that only makes the problem even more obvious.
I've seen the TV version of that video so I know what it looks like. My experience from comparing different encodes tells me how some fluctuation in color is normal, due to different tuner and tuning settings (more an analogue problem than a digital one nowadays), different broadcasted and subsequently captured raws, encoder and filter colorspace issue, and any enhancement the encoder (person) wants to add.
But even if you haven't seen the original video before, you can tell which one looks the most and least s**tty -


Four photos, with AMD video enhancements on and off, and display calibration on and off, in various combinations. +5 brightness and +25 contrast added in Photoshop as a noobish attempt to compensate for camera color response.
I'd expect some fight between 2 and 4, but 4 is closer to the original video, and 2 looks worse when big (click for 800x600). Photo 4 is with display calibration on and video enhancements off. As you can see this screen is fairly inaccurate while uncalibrated (photo 3), it is one of the earliest 19-inchers and only has a VGA input.
With an uncalibrated screen and enhancements on by default, I was greeted with the oversaturated POS of photo 1.
Fortunately I already knew that ATi / AMD cards have video enhancements on by default all along, and that it only works with MPEG2 (now also H.264 and VC-1 as long as you are using DXVA), so for all the MPEG4 ASP and AVC videos it didn't have any effect so I ignored it. But this video is MPEG2.
Speaking of oversaturation, this is what can happen with enhancements on, at least with an uncalibrated screen -


You know something is wrong when dark hair turns from being a light absorber to a light emitter.
Enhancements can be good sometimes, but they can be very bad many other times. So it should be left off by default unless the user wants it. However this is not the case with consumer video products, where upscalers, more vibrant colors, sharper edges, and motion-enhancement-whatever flood the market.
What I saw, was a putrid mush of ****.
It should be noted, at that point in time, my 913V was not calibrated. But that only makes the problem even more obvious.
I've seen the TV version of that video so I know what it looks like. My experience from comparing different encodes tells me how some fluctuation in color is normal, due to different tuner and tuning settings (more an analogue problem than a digital one nowadays), different broadcasted and subsequently captured raws, encoder and filter colorspace issue, and any enhancement the encoder (person) wants to add.
But even if you haven't seen the original video before, you can tell which one looks the most and least s**tty -


Four photos, with AMD video enhancements on and off, and display calibration on and off, in various combinations. +5 brightness and +25 contrast added in Photoshop as a noobish attempt to compensate for camera color response.
I'd expect some fight between 2 and 4, but 4 is closer to the original video, and 2 looks worse when big (click for 800x600). Photo 4 is with display calibration on and video enhancements off. As you can see this screen is fairly inaccurate while uncalibrated (photo 3), it is one of the earliest 19-inchers and only has a VGA input.
With an uncalibrated screen and enhancements on by default, I was greeted with the oversaturated POS of photo 1.
Fortunately I already knew that ATi / AMD cards have video enhancements on by default all along, and that it only works with MPEG2 (now also H.264 and VC-1 as long as you are using DXVA), so for all the MPEG4 ASP and AVC videos it didn't have any effect so I ignored it. But this video is MPEG2.
Speaking of oversaturation, this is what can happen with enhancements on, at least with an uncalibrated screen -


You know something is wrong when dark hair turns from being a light absorber to a light emitter.
Enhancements can be good sometimes, but they can be very bad many other times. So it should be left off by default unless the user wants it. However this is not the case with consumer video products, where upscalers, more vibrant colors, sharper edges, and motion-enhancement-whatever flood the market.
Monday, January 24, 2011
No sound from Intel on-board graphics' HDMI on XP? Here's the fix.
Google KB888111.exe.
Install that, then reinstall your graphics driver.
Install that, then reinstall your graphics driver.
Friday, January 21, 2011

Monday, January 10, 2011
Coaxial S/PDIF-out from X-Fi XtremeGamer SPDIF_IO header
The low-profile X-Fi XtremeGamer is devoid of connectivity; but hey, which consumer soundcard isn't.
Apparently the connections of some newer high-end soundcards are becoming more bare than that of on-board sound, but I digress.


The SPDIF_IO header on my XtremeGamer has always interested me. I've been using this card's optical out but would prefer coaxial, and I needed a coaxial in for testing purposes.
This is my actual card.

And this is the connector:

A bit of poking with the multimeter reveals this:

Considering the alignment of the +5V, Ground and 10k to ground pins, those are probably for the optical SPDIF-in. Or the 10k to ground pin could be something to connect to +5V to activate the other ground pins which are otherwise too numerous. Perhaps I should call them "mystery pins". At any rate, it does not work as coaxial SPDIF-in.
EDIT: After looking around other Creative cards with this connector, I came to a conclusion that, the unknown 10k to ground pin, is indeed SPDIF-in. However since it has a 10k load it will not work well with a 75-ohm coaxial cable source. A buffer or a source that can handle the load, like the electrical signal generated from the optical-in, Creative's drive-bay console whatever things, even SPDIF-out from the motherboard and CD-ROM drive should work - I haven't confirmed it myself yet but you can always try.
I didn't get the first prize but at least got the consolation prize. So all that's needed for coaxial SPDIF-out is pins 7 and 9. Digging through the box-o'-rubbish I came up with this contraption:

Fixed onto the card, center (signal) wire to pin 9, outer shell (ground) to pin 7.

Installed it into my com. Viola, it works.
Apparently the connections of some newer high-end soundcards are becoming more bare than that of on-board sound, but I digress.


The SPDIF_IO header on my XtremeGamer has always interested me. I've been using this card's optical out but would prefer coaxial, and I needed a coaxial in for testing purposes.
This is my actual card.

And this is the connector:

A bit of poking with the multimeter reveals this:

Considering the alignment of the +5V, Ground and 10k to ground pins, those are probably for the optical SPDIF-in. Or the 10k to ground pin could be something to connect to +5V to activate the other ground pins which are otherwise too numerous. Perhaps I should call them "mystery pins". At any rate, it does not work as coaxial SPDIF-in.
EDIT: After looking around other Creative cards with this connector, I came to a conclusion that, the unknown 10k to ground pin, is indeed SPDIF-in. However since it has a 10k load it will not work well with a 75-ohm coaxial cable source. A buffer or a source that can handle the load, like the electrical signal generated from the optical-in, Creative's drive-bay console whatever things, even SPDIF-out from the motherboard and CD-ROM drive should work - I haven't confirmed it myself yet but you can always try.
I didn't get the first prize but at least got the consolation prize. So all that's needed for coaxial SPDIF-out is pins 7 and 9. Digging through the box-o'-rubbish I came up with this contraption:

Fixed onto the card, center (signal) wire to pin 9, outer shell (ground) to pin 7.

Installed it into my com. Viola, it works.
Sunday, November 7, 2010
Online guides and why I hate them
I read that not being precise in the wording of the title helps to dramatize things. By being inaccurate - that is the essence dramatization.
I do not hate all guides - I got a whole tonne of knowledge from the internet. Of course, I process these data and come out with new ones of my own, which I write about and share.
The guides I hate, fall into one or both of the following categories - guides that are written based on second-hand knowledge, and guides that are written by noobs.
You'll be surprised, after reading this post, that if you look around the web you can find a huge number of guides that belong to these two categories.
First, guides that are based on second-hand knowledge.
What are second-hand, or secondary knowledge/info/sources? Those are information that you get from somewhere else, as opposed to info that you get or confirm on your own, which is called first-hand knowledge.
What is wrong with second-hand knowledge? Information dilution and accuracy issues.
You got your info from somewhere. At best you can only repeat 100% of whatever information that is written if you didn't add any of your own. Chances are, you don't get the full 100%.
So if your guide is only going to be less informative and more inaccurate than wherever you got it from, why bother wasting bandwidth and the time of poor suckers who were lured into reading it because they needed genuine help on the topic while you spammed your "guide" on forums as if they are your personal webpages? Just link them to a proper guide instead of taking credit! Oh yes, credit, you didn't get the info on your own so credit where necessary.
Next, guides that are written by noobs.
Recall the definition of newbies - those new in a certain area, and noobs, those that plain suck and think they are pro and hence refuse to learn.
Newbies will never write a guide because they do not think they are good enough. If they think they are good enough but are actually not, they are noobs. Hence noob guides are all written by... erm... noobs.
No need much explanation for this - the guide just sucks.
There is a saying however, that game guides are written by people who get pwned so much that instead of enjoying the game by laughing evilly killing others they find more joy in sharing their unconfirmed theories (read - secondary knowledge) on how to play well. This goes in line with the saying - "Those who can't do, teach".
I'm not against more basic, less detailed guides, because there is always a need for teachers. And having taught before I understand first-hand that you need to teach at the level of the student. For example, getting the guy doing your university mathematics tutorials to teach primary school is impossible. Not that he/she does a good job teaching 20-year-olds either, but you get the idea.
But guides that are WRONG because the author is a noob just pisses me off.
So as you might have realized by now, noob and second-hand guides often overlap.
Oh yes I found a good forum thread on "Those who can't do, teach". I'll extract out the various versions of the saying.
I do not hate all guides - I got a whole tonne of knowledge from the internet. Of course, I process these data and come out with new ones of my own, which I write about and share.
The guides I hate, fall into one or both of the following categories - guides that are written based on second-hand knowledge, and guides that are written by noobs.
You'll be surprised, after reading this post, that if you look around the web you can find a huge number of guides that belong to these two categories.
First, guides that are based on second-hand knowledge.
What are second-hand, or secondary knowledge/info/sources? Those are information that you get from somewhere else, as opposed to info that you get or confirm on your own, which is called first-hand knowledge.
What is wrong with second-hand knowledge? Information dilution and accuracy issues.
You got your info from somewhere. At best you can only repeat 100% of whatever information that is written if you didn't add any of your own. Chances are, you don't get the full 100%.
So if your guide is only going to be less informative and more inaccurate than wherever you got it from, why bother wasting bandwidth and the time of poor suckers who were lured into reading it because they needed genuine help on the topic while you spammed your "guide" on forums as if they are your personal webpages? Just link them to a proper guide instead of taking credit! Oh yes, credit, you didn't get the info on your own so credit where necessary.
Next, guides that are written by noobs.
Recall the definition of newbies - those new in a certain area, and noobs, those that plain suck and think they are pro and hence refuse to learn.
Newbies will never write a guide because they do not think they are good enough. If they think they are good enough but are actually not, they are noobs. Hence noob guides are all written by... erm... noobs.
No need much explanation for this - the guide just sucks.
There is a saying however, that game guides are written by people who get pwned so much that instead of enjoying the game by laughing evilly killing others they find more joy in sharing their unconfirmed theories (read - secondary knowledge) on how to play well. This goes in line with the saying - "Those who can't do, teach".
I'm not against more basic, less detailed guides, because there is always a need for teachers. And having taught before I understand first-hand that you need to teach at the level of the student. For example, getting the guy doing your university mathematics tutorials to teach primary school is impossible. Not that he/she does a good job teaching 20-year-olds either, but you get the idea.
But guides that are WRONG because the author is a noob just pisses me off.
So as you might have realized by now, noob and second-hand guides often overlap.
Oh yes I found a good forum thread on "Those who can't do, teach". I'll extract out the various versions of the saying.
Saturday, May 29, 2010
EAX5 via DS3D GX on HT Omega Claro (or other CMI8788 cards) using Xonar driver
Introduction
The AV100 and AV200 processors found on Asus's Xonar line of sound cards are known to be C-Media's CMI8788. Even Asus's drivers say so:

Naturally, at least one person would eventually make use of that fact to install Xonar's drivers on other CMI8788-based cards to get software-emulated EAX5 found on Xonar's drivers.
There are at least two methods to install a driver not meant for the device, I'll touch on one that works (in enabling EAX for non-Xonar cards), and one that didn't.
Changing the subsystem ID in the driver .ini/.inf files
It didn't work, so I won't go into details.
The driver installs, but does not work - Xonar Audio Center does not run, digital out works or doesn't depending on whether you had installed the soundcard's original drivers previously, analog out not tested, no DS3D GX.

Changing the card's subsystem ID in EEPROM
If DS3D GX is enabled through Xonar Audio Center, then that center must be made to work (it has no ini/inf that can be edited). The other method to disguise a card as something else is changing its device and subsystem ID.
Fortunately due to the apparent frequent failure of EEPROM of Xonar series of cards people wrote a EEPROM writer for it:
Xonar EEPROM Failure - AlsaProject
When run the program gives you a list of device IDs with their respective cards' names to write to your card's EEPROM, including Razer Barracuda AC-1.
If your card is PCI, choose a PCI card; if it is PCI-E, choose a PCI-E card.
Asus's naming system - PCI-E versions of the cards have an X at the end of their name - DX, D2X, STX, only exception is HDAV1.3 which is a PCI-E card, with the PCI version being HDAV1.3 Slim
This is where you need to trial-and-error - not all, if any, of the Xonar drivers/IDs work with your card's analog out, digital out worked for me in all cases I tried.
For HT Omega Claro, the one that works is Xonar D1.
After changing EEPROM:

Testing if DS3D GX/EAX5 is working
First there is the above program to tell you what features the card has.
Secondly you can run games that are known to crash with Xonar's DS3D GX (a lot), if your card now crashes the game, congratulations, you have managed to recreate the DS3D GX crashing games part on your card.
Any other suggestions on testing EAX5 functionality are welcome.
The AV100 and AV200 processors found on Asus's Xonar line of sound cards are known to be C-Media's CMI8788. Even Asus's drivers say so:

Naturally, at least one person would eventually make use of that fact to install Xonar's drivers on other CMI8788-based cards to get software-emulated EAX5 found on Xonar's drivers.
There are at least two methods to install a driver not meant for the device, I'll touch on one that works (in enabling EAX for non-Xonar cards), and one that didn't.
Changing the subsystem ID in the driver .ini/.inf files
It didn't work, so I won't go into details.
The driver installs, but does not work - Xonar Audio Center does not run, digital out works or doesn't depending on whether you had installed the soundcard's original drivers previously, analog out not tested, no DS3D GX.

Changing the card's subsystem ID in EEPROM
If DS3D GX is enabled through Xonar Audio Center, then that center must be made to work (it has no ini/inf that can be edited). The other method to disguise a card as something else is changing its device and subsystem ID.
Fortunately due to the apparent frequent failure of EEPROM of Xonar series of cards people wrote a EEPROM writer for it:
Xonar EEPROM Failure - AlsaProject
When run the program gives you a list of device IDs with their respective cards' names to write to your card's EEPROM, including Razer Barracuda AC-1.
If your card is PCI, choose a PCI card; if it is PCI-E, choose a PCI-E card.
Asus's naming system - PCI-E versions of the cards have an X at the end of their name - DX, D2X, STX, only exception is HDAV1.3 which is a PCI-E card, with the PCI version being HDAV1.3 Slim
This is where you need to trial-and-error - not all, if any, of the Xonar drivers/IDs work with your card's analog out, digital out worked for me in all cases I tried.
For HT Omega Claro, the one that works is Xonar D1.
After changing EEPROM:

Testing if DS3D GX/EAX5 is working
First there is the above program to tell you what features the card has.
Secondly you can run games that are known to crash with Xonar's DS3D GX (a lot), if your card now crashes the game, congratulations, you have managed to recreate the DS3D GX crashing games part on your card.
Any other suggestions on testing EAX5 functionality are welcome.
Testing your sound card for bit-perfect output - the DTS test - computer version
For people who don't have an AVR/DTS decoder
1) Download a DTS file from above
2) Rename it to .wav, when played you will hear white noise
3) Get Cool Edit (Audacity will not work)
4) Connect SPDIF-out to SPDIF-in of your card (of choice, can be same card, can be different)
Set-up for recording through SPDIF
5) Configure the source soundcard's output - SPDIF sampling rate same as source file, master and/or wave volume max, no effects/filters
6) Play through player of your choice - DS, KS, ASIO, anything
Press play before recording
7) Click the red button to start recording - select the same sampling rate as your source file/card, for resolution if the source is 16-bit select 16-bit, if 24-bit select 32-bit (float) - not verified
8) If done correctly you should see a square wave of -12dB, which is white noise when played back
 9) Save as Windows PCM (*.wav) file
10) Rename to .dts
11) Play with your player, if music comes out, DTS test pass
Note - My method is quite different from what most others had said on the internet, particularly the part requiring BeSplit. What's different about my method is that mine works for me and that doesn't, and as can be seen from the replies that also doesn't work for many others asking how to do the same thing.
I will not say that method doesn't work, but if you find that it doesn't work for you, try alternatives.
Results - 44.1kHz/16-bit Stereo source file
Note - the "Xonar D2" (in inverted commas) is actually a HT Omega Claro running on Xonar D2 drivers. It was like this before the test and I did not bother changing it back because the drivers are largely the same, I would not expect any difference between different versions of the driver
C-Media Oxygen ASIO is the ASIO driver for CMI8788-based cards
Player used: foobar2000 unless otherwise stated
Prodigy 7.1 HiFi comes with a flexible clock system that supports [b]auto-detection and changing of sampling rate[/b] or can be locked to a manually chosen frequency, in which case resampling takes place if needed, or it can derive its clock from incoming SPDIF signal.
Prodigy (auto sampling rate unless specified)
Prodigy KS - ok
Prodigy ASIO - ok
Prodigy DS - ok
Prodigy QVE - waveform reduced in amplitude, file not recognized
Prodigy KS (reduced volume in foobar) - file not recognized
Prodigy KS (volume reduced midway) - file stops midway
Prodigy KS (locked frequency =/= 44.1kHz) - foobar returns error
Prodigy ASIO (locked frequency =/= 44.1kHz) - frequency force changed in control panel, foobar proceeds as normal - ok
Prodigy DS (locked frequency =/= 44.1kHz) - frequency remains locked, foobar proceeds as normal, Windows resamples sound, file not recognized
Prodigy QVE (locked frequency =/= 44.1kHz) - frequency forced changed in control panel, foobar proceeds as normal, waveform reduced in amplitude, file not recognized
"Xonar D2"
"Xonar D2" KS 44.1kHz - ok
C-Media Oxygen ASIO 44.1kHz - ok
"Xonar D2" DS 44.1kHz - ok
"Xonar D2" DS 44.1kHz (reduced volume in Windows) - file not recognized
"Xonar D2" Windows Media Player 44.1kHz - ok
Two numbers show combination of source card's output sampling rate and sampling rate selected in Cool Edit
"Xonar D2" KS 48-44 - waveform does not look like DTS
"Xonar D2" KS 48-48 - waveform does not look like DTS
"Xonar D2" KS 44-48 - waveform looks like DTS, file not recognized
Realtek ALC888S
ALC888S Windows Media Player 44.1kHz - ok
Also to be noted: When using Prodigy's internal M-Clock to record others, pops/noise occur at regular intervals. Hows that for the supporters of synchronous reclocking?
Important things to note
- possible to pass DTS test using DS and WMP if all volumes are set to max
- card only passes test if the SPDIF output sampling rate is set to the same as whatever the player is sending it through DS/KS/ASIO - take note if you're not using a card with automatic sampling-rate changing
- Realtek (non-AC'97 version) is capable of passing DTS test
Possible follow-ups
- test with 48kHz and >48kHz source files
And while I'm at it, here's a screenshot of a 192kHz file recorded through TOSLINK for those who still believe it cannot be done

Whether the equipment can do 192/24 or above is up to the parts used. The Prodigy 7.1 HiFi sends and receives 96kHz max, but the Omega Claro and Realtek can do 192.
1) Download a DTS file from above
2) Rename it to .wav, when played you will hear white noise
3) Get Cool Edit (Audacity will not work)
4) Connect SPDIF-out to SPDIF-in of your card (of choice, can be same card, can be different)
Set-up for recording through SPDIF
5) Configure the source soundcard's output - SPDIF sampling rate same as source file, master and/or wave volume max, no effects/filters
6) Play through player of your choice - DS, KS, ASIO, anything
Press play before recording
7) Click the red button to start recording - select the same sampling rate as your source file/card, for resolution if the source is 16-bit select 16-bit, if 24-bit select 32-bit (float) - not verified
8) If done correctly you should see a square wave of -12dB, which is white noise when played back
 9) Save as Windows PCM (*.wav) file
10) Rename to .dts
11) Play with your player, if music comes out, DTS test pass
Note - My method is quite different from what most others had said on the internet, particularly the part requiring BeSplit. What's different about my method is that mine works for me and that doesn't, and as can be seen from the replies that also doesn't work for many others asking how to do the same thing.
I will not say that method doesn't work, but if you find that it doesn't work for you, try alternatives.
Results - 44.1kHz/16-bit Stereo source file
Note - the "Xonar D2" (in inverted commas) is actually a HT Omega Claro running on Xonar D2 drivers. It was like this before the test and I did not bother changing it back because the drivers are largely the same, I would not expect any difference between different versions of the driver
C-Media Oxygen ASIO is the ASIO driver for CMI8788-based cards
Player used: foobar2000 unless otherwise stated
Prodigy 7.1 HiFi comes with a flexible clock system that supports [b]auto-detection and changing of sampling rate[/b] or can be locked to a manually chosen frequency, in which case resampling takes place if needed, or it can derive its clock from incoming SPDIF signal.
Prodigy (auto sampling rate unless specified)
Prodigy KS - ok
Prodigy ASIO - ok
Prodigy DS - ok
Prodigy QVE - waveform reduced in amplitude, file not recognized
Prodigy KS (reduced volume in foobar) - file not recognized
Prodigy KS (volume reduced midway) - file stops midway
Prodigy KS (locked frequency =/= 44.1kHz) - foobar returns error
Prodigy ASIO (locked frequency =/= 44.1kHz) - frequency force changed in control panel, foobar proceeds as normal - ok
Prodigy DS (locked frequency =/= 44.1kHz) - frequency remains locked, foobar proceeds as normal, Windows resamples sound, file not recognized
Prodigy QVE (locked frequency =/= 44.1kHz) - frequency forced changed in control panel, foobar proceeds as normal, waveform reduced in amplitude, file not recognized
"Xonar D2"
"Xonar D2" KS 44.1kHz - ok
C-Media Oxygen ASIO 44.1kHz - ok
"Xonar D2" DS 44.1kHz - ok
"Xonar D2" DS 44.1kHz (reduced volume in Windows) - file not recognized
"Xonar D2" Windows Media Player 44.1kHz - ok
Two numbers show combination of source card's output sampling rate and sampling rate selected in Cool Edit
"Xonar D2" KS 48-44 - waveform does not look like DTS
"Xonar D2" KS 48-48 - waveform does not look like DTS
"Xonar D2" KS 44-48 - waveform looks like DTS, file not recognized
Realtek ALC888S
ALC888S Windows Media Player 44.1kHz - ok
Also to be noted: When using Prodigy's internal M-Clock to record others, pops/noise occur at regular intervals. Hows that for the supporters of synchronous reclocking?
Important things to note
- possible to pass DTS test using DS and WMP if all volumes are set to max
- card only passes test if the SPDIF output sampling rate is set to the same as whatever the player is sending it through DS/KS/ASIO - take note if you're not using a card with automatic sampling-rate changing
- Realtek (non-AC'97 version) is capable of passing DTS test
Possible follow-ups
- test with 48kHz and >48kHz source files
And while I'm at it, here's a screenshot of a 192kHz file recorded through TOSLINK for those who still believe it cannot be done

Whether the equipment can do 192/24 or above is up to the parts used. The Prodigy 7.1 HiFi sends and receives 96kHz max, but the Omega Claro and Realtek can do 192.
Sunday, August 2, 2009
Splitting/cutting MKV files - finally!
For very long, there wasn't anything useful on this page. Which went against my philosophy of blogging. Which is to write information that cannot be found elsewhere, and hopefully be useful.
One day I decided to face again a problem which I've had for years and finally found a solution for it. It was such a long problem because nobody had written a solution that could be found by me. Ironically it would've been so easy for regular encoders/muxers that they wouldn't be bothered to write a guide for it.
So here I am, writing the solution for people who did not have a chance to come across it yet.
By split I mean extracting out a segment of the video from the MKV file, with subtitles, multiple audio tracks and whatever that can be stuffed into an MKV container, extract it into another MKV file (for proper H.264, subtitles support), without reencoding. Not Haali Media Splitter mind you. Those are DirectShow splitters.
We need 3 (or 4) programs for this -
- AVISynth
- AVISynthesizer (optional)
- VirtualDub/VirtualDubMod
- MKVtoolnix w/mkvmerge GUI (again, the GUI part is optional, but only if you're super hardcore programmer)
With some skills you can probably replace AVISynth to VirtualDub with Windows Media Player, but we're looking at accuracy and reliability here.
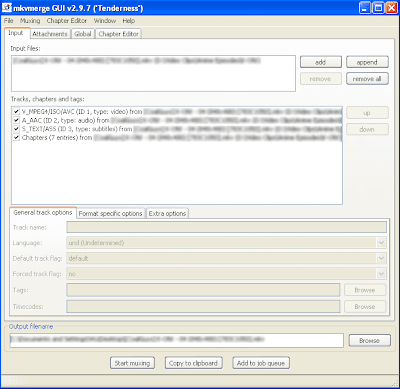
This is what you see when you open the file in mkvmerge GUI.
Go to the Global tag.
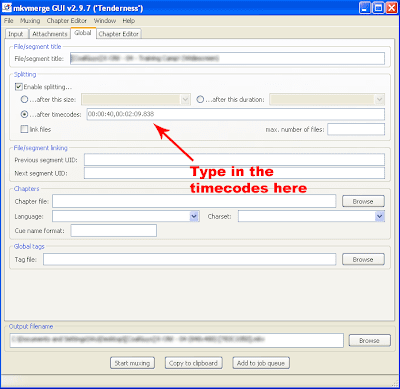
This is where you insert the timecodes.
Frankly, I don't know how to explain what timecode is. But frankly, if you didn't know what timecode is and cannot understand it just by looking, you shouldn't attempt in any form of video encoding or editing.
What will happen is that mkvmerge will split the file into three segments - the part before what you want, the part of what you want, and the part after what you want. You can delete the part before, and abort muxing the part after, hence leaving just the part you want.
Now... where to get the timecodes?
That's where VirtualDub comes in:
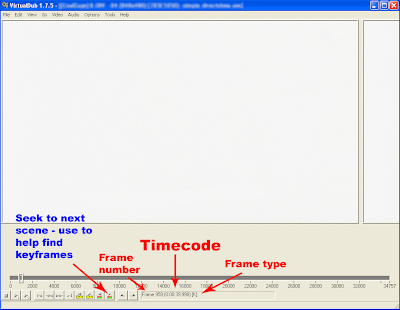
This is the start of the segment that I want
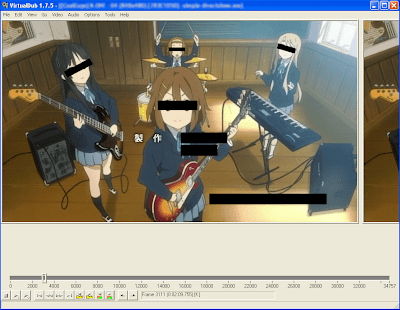
This is the end - take down the timecodes. Take note - mkvmerge requires the timecode to be in HH:MM:SS.nnn format, unlike H:MM:SS.nnn in VirtualDub. Change accordingly.
But you cannot just open any file in VirtualDub. That's where AVISynth (and AVISynthesizer) comes in handy. You can find guides on AVISynth easily, and I have a guide on AVISynthesizer here but the image has been deleted by ImageShack - do not use ImageShack for any long-term image hosting.
So there you go - open the file in VirtualDub, search for the start and end of what you want, but instead of clicking Save as AVI write down the timecodes of the frames (or the frame before that frame - see below)
Issues on keyframes
As you seasoned cutters/joiners know, Direct Stream Copy (or no reencoding) means the video has to start on a keyframe. If you start on a non-keyframe, either the starting is skipped to the next keyframe, or pushed forward to the previous keyframe, depending on the program.
mkvmerge uses the first keyframe after whichever frames you selected as the start and end of the segment. Even if that frame happens to be a keyframe also (? - not sure, needs to be verified), which people would instinctively select. i.e.
Example -
I select frames 100-500.
Frames 100, 200 and 600 are keyframes.
The segment starts from frame 200 and ends on 600.
It's dumb, I know. But this thing isn't meant to be a cutter in the first place.
So instead of selecting frame 100, start with the frame before it e.g. frame 99 instead.
Now how to know which are the keyframes - since all frames show up as keyframes in VirtualDub - which is correct because AVISynth feeds it uncompressed AVI
Use the Next scene seek function/button in VirtualDub - it's just a scene change detector, but most of the time a keyframe will lie where a scene change is, so it's a good guide. I've seen exceptions however, especially when fading in/out.
Do not use Prev scene seek unless you want to wait for eternity.
Known bugs
Apart from the above mentioned (which isn't technically a bug), there may be some syncing problems at the start of the segment, due to the way MKV works as opposed to AVI. Goes away after a few frames however.
One day I decided to face again a problem which I've had for years and finally found a solution for it. It was such a long problem because nobody had written a solution that could be found by me. Ironically it would've been so easy for regular encoders/muxers that they wouldn't be bothered to write a guide for it.
So here I am, writing the solution for people who did not have a chance to come across it yet.
By split I mean extracting out a segment of the video from the MKV file, with subtitles, multiple audio tracks and whatever that can be stuffed into an MKV container, extract it into another MKV file (for proper H.264, subtitles support), without reencoding. Not Haali Media Splitter mind you. Those are DirectShow splitters.
We need 3 (or 4) programs for this -
- AVISynth
- AVISynthesizer (optional)
- VirtualDub/VirtualDubMod
- MKVtoolnix w/mkvmerge GUI (again, the GUI part is optional, but only if you're super hardcore programmer)
With some skills you can probably replace AVISynth to VirtualDub with Windows Media Player, but we're looking at accuracy and reliability here.

This is what you see when you open the file in mkvmerge GUI.
Go to the Global tag.

This is where you insert the timecodes.
Frankly, I don't know how to explain what timecode is. But frankly, if you didn't know what timecode is and cannot understand it just by looking, you shouldn't attempt in any form of video encoding or editing.
What will happen is that mkvmerge will split the file into three segments - the part before what you want, the part of what you want, and the part after what you want. You can delete the part before, and abort muxing the part after, hence leaving just the part you want.
Now... where to get the timecodes?
That's where VirtualDub comes in:

This is the start of the segment that I want

This is the end - take down the timecodes. Take note - mkvmerge requires the timecode to be in HH:MM:SS.nnn format, unlike H:MM:SS.nnn in VirtualDub. Change accordingly.
But you cannot just open any file in VirtualDub. That's where AVISynth (and AVISynthesizer) comes in handy. You can find guides on AVISynth easily, and I have a guide on AVISynthesizer here but the image has been deleted by ImageShack - do not use ImageShack for any long-term image hosting.
So there you go - open the file in VirtualDub, search for the start and end of what you want, but instead of clicking Save as AVI write down the timecodes of the frames (or the frame before that frame - see below)
Issues on keyframes
As you seasoned cutters/joiners know, Direct Stream Copy (or no reencoding) means the video has to start on a keyframe. If you start on a non-keyframe, either the starting is skipped to the next keyframe, or pushed forward to the previous keyframe, depending on the program.
mkvmerge uses the first keyframe after whichever frames you selected as the start and end of the segment. Even if that frame happens to be a keyframe also (? - not sure, needs to be verified), which people would instinctively select. i.e.
Example -
I select frames 100-500.
Frames 100, 200 and 600 are keyframes.
The segment starts from frame 200 and ends on 600.
It's dumb, I know. But this thing isn't meant to be a cutter in the first place.
So instead of selecting frame 100, start with the frame before it e.g. frame 99 instead.
Now how to know which are the keyframes - since all frames show up as keyframes in VirtualDub - which is correct because AVISynth feeds it uncompressed AVI
Use the Next scene seek function/button in VirtualDub - it's just a scene change detector, but most of the time a keyframe will lie where a scene change is, so it's a good guide. I've seen exceptions however, especially when fading in/out.
Do not use Prev scene seek unless you want to wait for eternity.
Known bugs
Apart from the above mentioned (which isn't technically a bug), there may be some syncing problems at the start of the segment, due to the way MKV works as opposed to AVI. Goes away after a few frames however.
Tuesday, December 23, 2008
The irony of knowledge - Choosing the right PSU
In the past, a small group of people knew the actual power consumption of computers; while people are mad-buying 500W PSUs just for that Pentium 4 and power-hungry (at that time) Radeon 9800Pro I ran it smoothly on a 300W FSP PSU.
At that time, there were PSU calculators that showed much higher wattage numbers (probably dropped from the sky) and encouraged people to buy oversized PSUs.
Now, the blatant lying in PSU wattage ratings has been exposed, thanks to sites (notably SPCR) that stress-test the PSUs to their rated limit and measure actual system and component power consumption. The truth is clear: a decent PSU of modest ratings can handle lots of medium-to-high-power systems. A system with a mid-end graphics card + cpu never takes more than 200W.
The move was good; previously manufacturors could overrate their products because the user would believe that the product failed due to their systems indeed drawing too much power, now they are forced to produce PSUs that do withstand the torture.
So all is well and cheery? Well not to everyone.
I have seen a few cases of people buying underpowered PSUs and then selling them due to being unable to sustain their rigs. And more cases of people thinking that an underpowered PSU would be able to support a system on forums.
Why the reverse?
When people read somewhere that the system only measure 300W, then they recommend a 300W PSU. Or maybe 400W. But it will never be adequate.
1) The more problematic mistake would be not looking at the seperate power ratings on the different voltage rails, most importantly, +12V. Because bulk of high-power draw comes from here. The +3.3V and +5V, I can never imagine more than 50W coming from it.
So lets take 50W from +3.3V and +5V rails combined. That leaves 250W from the +12V. Now, find me a 300W PSU that has 250W from the +12V rail.
Manufacturors knew they were getting busted on the false ratings, so they needed to have real ratings, yet have a nice big number on the packaging. So they have lots of wattage on the +3.3V and +5V (which, btw, is most usually true), and very little on the +12V. Any failure due to an underpowered PSU will be blamed on the user not reading the fine print carefully.
2) So now we have PSUs that are both solid and have lots of amperage on the +12V, and I have a 400W PSU that has 300W on +12V. So now what's the problem here?
Well, firstly, you would not want to run anything at or near its limits for long, not especially for a product that is known to deteriorate over time. Plus, any sudden huge power draw (like spinning up a harddisk - this eats a lot of power - while gaming) is going to force a shutdown.
Running a PSU near its limit has another side effect - your system is going to have a tornado inside. The fan is going to spin at near its limit, too.
Secondly, though less importantly, is cross-loading. Cross-loading is about having too much load on one rail while not having much on the rest (quite strangely for the name of the term). The result is voltage going out of spec, either more or less. Most PSUs today can handle this quite well in normal circumstances, but not all can do it perfect at the max rating of any rail. I myself have seen a PSU that die and got replaced multiple times due to too little power draw on the +12V.
It may be a small problem, but everything adds up.
My guideline is to have the system draw around half of the PSU's max rating, personally I prefer less but some may like more due to the better efficiency it gives on certain lines of PSU. (However, I have noticed that more and more higher-power PSUs are having their optimal efficiency at loads much less than half of maximum rating, suggesting that they are building a PSU that is optimized to lower power loads, but it is also solid enough to withstand more power. This is a good move for most people with low-power-draw system, but bad for the hardcores and does not reflect good on the product)
Hence, for a system that draws 300W, I'd give it around 600W on +12V, which gives us...
A 700W-800W PSU.
Aren't we back to where we first started off?
Only except this time, we can be darn sure that our PSU is not going to blow up anytime soon.
At that time, there were PSU calculators that showed much higher wattage numbers (probably dropped from the sky) and encouraged people to buy oversized PSUs.
Now, the blatant lying in PSU wattage ratings has been exposed, thanks to sites (notably SPCR) that stress-test the PSUs to their rated limit and measure actual system and component power consumption. The truth is clear: a decent PSU of modest ratings can handle lots of medium-to-high-power systems. A system with a mid-end graphics card + cpu never takes more than 200W.
The move was good; previously manufacturors could overrate their products because the user would believe that the product failed due to their systems indeed drawing too much power, now they are forced to produce PSUs that do withstand the torture.
So all is well and cheery? Well not to everyone.
I have seen a few cases of people buying underpowered PSUs and then selling them due to being unable to sustain their rigs. And more cases of people thinking that an underpowered PSU would be able to support a system on forums.
Why the reverse?
When people read somewhere that the system only measure 300W, then they recommend a 300W PSU. Or maybe 400W. But it will never be adequate.
1) The more problematic mistake would be not looking at the seperate power ratings on the different voltage rails, most importantly, +12V. Because bulk of high-power draw comes from here. The +3.3V and +5V, I can never imagine more than 50W coming from it.
So lets take 50W from +3.3V and +5V rails combined. That leaves 250W from the +12V. Now, find me a 300W PSU that has 250W from the +12V rail.
Manufacturors knew they were getting busted on the false ratings, so they needed to have real ratings, yet have a nice big number on the packaging. So they have lots of wattage on the +3.3V and +5V (which, btw, is most usually true), and very little on the +12V. Any failure due to an underpowered PSU will be blamed on the user not reading the fine print carefully.
2) So now we have PSUs that are both solid and have lots of amperage on the +12V, and I have a 400W PSU that has 300W on +12V. So now what's the problem here?
Well, firstly, you would not want to run anything at or near its limits for long, not especially for a product that is known to deteriorate over time. Plus, any sudden huge power draw (like spinning up a harddisk - this eats a lot of power - while gaming) is going to force a shutdown.
Running a PSU near its limit has another side effect - your system is going to have a tornado inside. The fan is going to spin at near its limit, too.
Secondly, though less importantly, is cross-loading. Cross-loading is about having too much load on one rail while not having much on the rest (quite strangely for the name of the term). The result is voltage going out of spec, either more or less. Most PSUs today can handle this quite well in normal circumstances, but not all can do it perfect at the max rating of any rail. I myself have seen a PSU that die and got replaced multiple times due to too little power draw on the +12V.
It may be a small problem, but everything adds up.
My guideline is to have the system draw around half of the PSU's max rating, personally I prefer less but some may like more due to the better efficiency it gives on certain lines of PSU. (However, I have noticed that more and more higher-power PSUs are having their optimal efficiency at loads much less than half of maximum rating, suggesting that they are building a PSU that is optimized to lower power loads, but it is also solid enough to withstand more power. This is a good move for most people with low-power-draw system, but bad for the hardcores and does not reflect good on the product)
Hence, for a system that draws 300W, I'd give it around 600W on +12V, which gives us...
A 700W-800W PSU.
Aren't we back to where we first started off?
Only except this time, we can be darn sure that our PSU is not going to blow up anytime soon.
Saturday, October 11, 2008
How to repair your Mylar earphones and make them last longer
Apologies to those that have been following my blog, the reason for me not updating this blog for so long is because LaTale is so addicting, for many days it is LaTale as long as I'm at home. No Anime, little forums, research and repairs have been stalled, it is LaTale the first thing I get home.
(You should try it, really, it's this fun)
During this time, I had many things to post about, but left undone because of the game. Actually I'm only blogging now because the server is lagging now.
Unlike ZOMBiE who combines multiple blog posts into one, I'm still going to seperate them. Reason for this is categorization through tags, and so that I keep the blog posts shorter so that people can read them more easily and more importantly, it takes me less time to reach a stopping point and resume on the game. :P
The topic with the honour to be posted first, is as per the title.
As many users (and non-users but simply hearsayers, also known as sheeps, or audio-noobs) of the Crossroad Mylar series of products know, their build quality just isn't on-par with the rest out there. Physically coming apart within half a year is possible and achived by many that are under active use. The two most common problems are the cable connection at the earphones becoming loose and snap thereafter and the earphone itself breaking into two at the joint.
This blog post will teach you how to perform Basic Diagnosis And Repair, short-form BDAR, on your favourite earphones.
The friend here, as one of DIY-ers' favourite friends (another being the blu-tack), is the super-glue.
My second pair of X3i was having one of its connections coming apart. So I bought a small tube of super-glue (Note: Don't buy too big a tube, because if you don't finish it fast enough it'll dry up) and applied a drop at that point (with the bare wire exposed), and jammed it back in. Wait for a few minutes.
And viola! The X3i is alive again! No need to waste time and spend another trip to the Adelphi. In fact, the connection is now even studier than before, thx to the properties of super-glue, forming a hard crystalline structure, as a layer of coat on the external surface of the connecting area.
It's actually very easy to stop the Mylar from breaking apart in the first place, by proper design and better glue. Wonder why they didn't do that.
And note, if you accidentally let your hand contact super-glue, do not force it apart, soak it in soapy water and rub sideways. It will come off eventually.
(You should try it, really, it's this fun)
During this time, I had many things to post about, but left undone because of the game. Actually I'm only blogging now because the server is lagging now.
Unlike ZOMBiE who combines multiple blog posts into one, I'm still going to seperate them. Reason for this is categorization through tags, and so that I keep the blog posts shorter so that people can read them more easily and more importantly, it takes me less time to reach a stopping point and resume on the game. :P
The topic with the honour to be posted first, is as per the title.
As many users (and non-users but simply hearsayers, also known as sheeps, or audio-noobs) of the Crossroad Mylar series of products know, their build quality just isn't on-par with the rest out there. Physically coming apart within half a year is possible and achived by many that are under active use. The two most common problems are the cable connection at the earphones becoming loose and snap thereafter and the earphone itself breaking into two at the joint.
This blog post will teach you how to perform Basic Diagnosis And Repair, short-form BDAR, on your favourite earphones.
The friend here, as one of DIY-ers' favourite friends (another being the blu-tack), is the super-glue.
My second pair of X3i was having one of its connections coming apart. So I bought a small tube of super-glue (Note: Don't buy too big a tube, because if you don't finish it fast enough it'll dry up) and applied a drop at that point (with the bare wire exposed), and jammed it back in. Wait for a few minutes.
And viola! The X3i is alive again! No need to waste time and spend another trip to the Adelphi. In fact, the connection is now even studier than before, thx to the properties of super-glue, forming a hard crystalline structure, as a layer of coat on the external surface of the connecting area.
It's actually very easy to stop the Mylar from breaking apart in the first place, by proper design and better glue. Wonder why they didn't do that.
And note, if you accidentally let your hand contact super-glue, do not force it apart, soak it in soapy water and rub sideways. It will come off eventually.
Monday, July 28, 2008
Auto-control your fan speeds - SpeedFan
Firstly, you need to know about this useful little program called SpeedFan here. A search on Google or Yahoo will give better and more detailed reviews and guides, so I won't include those.
However, a lot of users do not know how to make this automatic, from turning on at startup and reducing the fan speed, to increasing the fan speed when things get too hot and reducing it thereafter. This guide is to cover this. With everything properly set, SpeedFan is far better than most fan controllers out there, and, best of all, it's free.
So here we go. Firstly, set SpeedFan to run at startup by placing its shortcut in the Startup folder in the Start Menu.
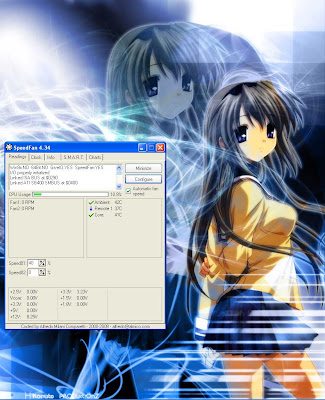
This is what you would see if you run SpeedFan without applying any settings, minus the info messages that you see on first run.
...except the speeds should both be 40% by default, and there will be much more and incomprehensible temperature readings. Depending on your mainboard, many of these will be meaningless, and you will only be interested in Core, Ambient, either one or two of Remote 1/2/3 or 4/5/6/7/8..., and HD0/HD1/HD2...
And actually there is a problem - on some systems, if a temperature of e.g. 127 or -128 (or 0 or 255) degrees celcius is detected by SpeedFan, even if it has no meaning and/or isn't connected to anywhere, the system will shut down in a minute or a few seconds, so act fast to remove the problematic readings.
You see the Speeds, but you're not going to touch them, since they will be automated after SpeedFan is configured. However, you must check Automatic Fan Speed for the speed to change automatically. It's useful to have that option so accessible, since sometimes you'll want the full or no power for overclocking/silent operation.
To configure SpeedFan, click the, erm, Configure button.
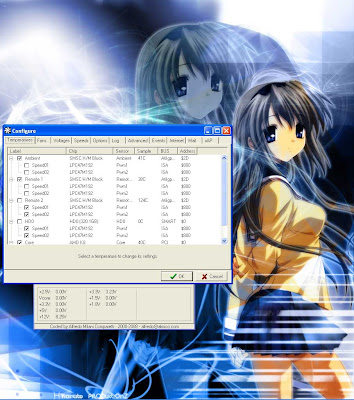
You see various temperatures and their sub-menus, which are Speed01 and Speed02. If you tick a temperature, it shows up on SpeedFan. If you tick the Speed in the sub menu, it means if that temperature is too high it will affect the speed. You can choose one or more or nil temperature to be affecting a certain speed.
When you click on a temperature, you can set the desired and warning temperatures. Plus whether it shows up in the system tray or is logged.
Your fan speeds will be at the minimum value if all related temperatures are below desired, will ramp up to the maximum value when between desired and warning, and go to 100% at warning temperature. Take note of how this works, and choose your temperatures wisely.
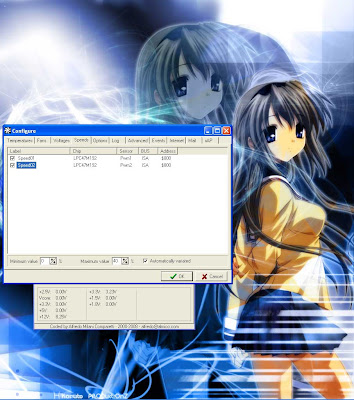
Next tab, Speeds, if you click on a speed, you see the minimum and maximum values they will be at. Plus whether to make it automatically varied.
The use of minimum and maximum values has just been explained earlier.
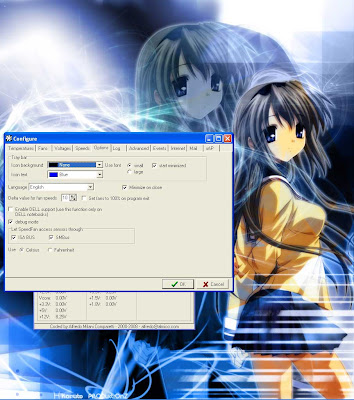
Since we're making it start on startup, it would be nice to start SpeedFan minimized so that it does not pop up and bug you. It is also nice to minimize on close since it's human nature to click close and for the case of SpeedFan, it really will close if the minimize on close option isn't checked.
Delta value for fan speeds - this allows how precise you can set your fan speed and also affects how fast the fan speed changes automatically. Lower values means a slower change.
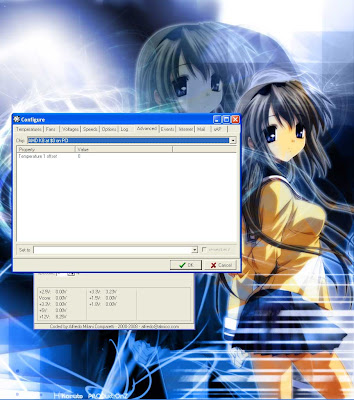
This Advanced tab is interesting, as advanced settings usually are. You can select the monitoring chip and change it's settings. In this case I'm showing my CPU, which gives the Core reading. Are we seeing something something interesting here? Temperature offset! Good for calibrating the sensor so that the temperature is accurate.
For the mainboard H/M (hardware monitoring) block, sometimes you can even choose which sensor to use for the different Remote readings.
Update 14/08/2011 -

Now, some explanations on the terms/logos:
Flame on the temperature means too hot (above warning), and all fans will be set to 100%
Red on the temperature means getting hot or a temperature increase. Affected fans will be set to maximum value
A green tick means temperatures are ok and stablized. Fan speeds will be minimum if this temperature is around or below desired temperature
A blue tick means temperatures are way below desired or decreasing. No problem here. Fan speeds will be at minimum
Core usually means the reading from the sensor inside the CPU, which will give the same reading as CoreTemp or other such programs that read this temperature
Remote1 usually means mainboard CPU temperature sensor, while Remote2 is northbridge/ambient temperature, although sometimes their roles shuffle around. I even had a Remote3 as CPU before. To know which is the CPU, just do a Prime95 and see which rises.
HD0 = first HDD, HD1 = 2nd HDD etc. Tends to be accurate because HDD temperatures are taken from S.M.A.R.T. i.e. the sensor system on your HDDs, there's no chance for non-standardized mobos to screw things up.
Speed01 and Speed02 - while this depends on your mainboard and where you plugged the fans to, so far my experience is that Speed02 is usually the CPU fan while Speed01 is the system/power fan or no effect. Again, to know which is which, just test. *Hint - CPU fan is always the fastest (and noisiest)
There you go. Enjoy your automatic speed control. :)
However, a lot of users do not know how to make this automatic, from turning on at startup and reducing the fan speed, to increasing the fan speed when things get too hot and reducing it thereafter. This guide is to cover this. With everything properly set, SpeedFan is far better than most fan controllers out there, and, best of all, it's free.
So here we go. Firstly, set SpeedFan to run at startup by placing its shortcut in the Startup folder in the Start Menu.

This is what you would see if you run SpeedFan without applying any settings, minus the info messages that you see on first run.
...except the speeds should both be 40% by default, and there will be much more and incomprehensible temperature readings. Depending on your mainboard, many of these will be meaningless, and you will only be interested in Core, Ambient, either one or two of Remote 1/2/3 or 4/5/6/7/8..., and HD0/HD1/HD2...
And actually there is a problem - on some systems, if a temperature of e.g. 127 or -128 (or 0 or 255) degrees celcius is detected by SpeedFan, even if it has no meaning and/or isn't connected to anywhere, the system will shut down in a minute or a few seconds, so act fast to remove the problematic readings.
You see the Speeds, but you're not going to touch them, since they will be automated after SpeedFan is configured. However, you must check Automatic Fan Speed for the speed to change automatically. It's useful to have that option so accessible, since sometimes you'll want the full or no power for overclocking/silent operation.
To configure SpeedFan, click the, erm, Configure button.

You see various temperatures and their sub-menus, which are Speed01 and Speed02. If you tick a temperature, it shows up on SpeedFan. If you tick the Speed in the sub menu, it means if that temperature is too high it will affect the speed. You can choose one or more or nil temperature to be affecting a certain speed.
When you click on a temperature, you can set the desired and warning temperatures. Plus whether it shows up in the system tray or is logged.
Your fan speeds will be at the minimum value if all related temperatures are below desired, will ramp up to the maximum value when between desired and warning, and go to 100% at warning temperature. Take note of how this works, and choose your temperatures wisely.

Next tab, Speeds, if you click on a speed, you see the minimum and maximum values they will be at. Plus whether to make it automatically varied.
The use of minimum and maximum values has just been explained earlier.

Since we're making it start on startup, it would be nice to start SpeedFan minimized so that it does not pop up and bug you. It is also nice to minimize on close since it's human nature to click close and for the case of SpeedFan, it really will close if the minimize on close option isn't checked.
Delta value for fan speeds - this allows how precise you can set your fan speed and also affects how fast the fan speed changes automatically. Lower values means a slower change.

This Advanced tab is interesting, as advanced settings usually are. You can select the monitoring chip and change it's settings. In this case I'm showing my CPU, which gives the Core reading. Are we seeing something something interesting here? Temperature offset! Good for calibrating the sensor so that the temperature is accurate.
Update 14/08/2011 -

I noticed on this mobo that the PWM mode is defaulted to SmartGuardian, which when selected will not follow SpeedFan's settings. Software controlled needs to be selected.
Now, some explanations on the terms/logos:
Flame on the temperature means too hot (above warning), and all fans will be set to 100%
Red on the temperature means getting hot or a temperature increase. Affected fans will be set to maximum value
A green tick means temperatures are ok and stablized. Fan speeds will be minimum if this temperature is around or below desired temperature
A blue tick means temperatures are way below desired or decreasing. No problem here. Fan speeds will be at minimum
Core usually means the reading from the sensor inside the CPU, which will give the same reading as CoreTemp or other such programs that read this temperature
Remote1 usually means mainboard CPU temperature sensor, while Remote2 is northbridge/ambient temperature, although sometimes their roles shuffle around. I even had a Remote3 as CPU before. To know which is the CPU, just do a Prime95 and see which rises.
HD0 = first HDD, HD1 = 2nd HDD etc. Tends to be accurate because HDD temperatures are taken from S.M.A.R.T. i.e. the sensor system on your HDDs, there's no chance for non-standardized mobos to screw things up.
Speed01 and Speed02 - while this depends on your mainboard and where you plugged the fans to, so far my experience is that Speed02 is usually the CPU fan while Speed01 is the system/power fan or no effect. Again, to know which is which, just test. *Hint - CPU fan is always the fastest (and noisiest)
There you go. Enjoy your automatic speed control. :)
Wednesday, May 14, 2008
An update to the various ways to improve Anime watching on the computer
1. I was searching the net for other asharp parameter combinations. Aside from the default 2-4-1 and the standard (and recommended by the programmer) 2-2-1, I read that some people wrote that 4-6-1 yields much better results both in sharpness and low noise for them. So I tried that out, and...
4-6-1 is terrible. Really. Lots of jagged edges even for high quality source and even worse for low quality ones. Any macroblock previously unseen is obvious also.
But, one thing to praise, is that the details are really, really, clear now. If the source is high quality enough. Else the only extra details you're going to see are jagged microblocks.
For simpler understanding, a good analogy would be SRS WOW effect at the max on a low-quality MP3, or, less accurately, turning up the treble/bass till it distorts into boominess and high-harsh. It's good, but unatural.
So the moral of the story is, always experiment and get something to your own liking.
Even 2-2-1 gives visible noise. But this is the best compromise I've tried, just that slight little increase in noise for that subtle but relatively significant increase in sharpness.
2. I refer to the guide where I change the resolution to that of the screen such that the subtitles will appear in the black bar area. Turns out there is a much simpler way to do this. And hence I apologize for the less correct method in my guide.
Under FFDShow's decoder settings, there is this Subtitles settings. Just check Letterbox and set the aspect ratio to the same as that of your screen. Done.
3. You can use CoreAVC/RealAlternative/watever thing in conjunction with FFDShow/CCCP's filters. Just enable Raw Video under the codecs. Thanks to simplyadvanced (VRZ) for pointing that out.
4. Aside from Lanczos, try Spline resize if you're upscaling by large multiples. It's supposed to be better than Lanczos for its lower ringing especially when upscaling by large multiples, and yes it is indeed better than Lanczos in this aspect. But the speed impact may make it unusable for normal playback. Use at personal preference.
4-6-1 is terrible. Really. Lots of jagged edges even for high quality source and even worse for low quality ones. Any macroblock previously unseen is obvious also.
But, one thing to praise, is that the details are really, really, clear now. If the source is high quality enough. Else the only extra details you're going to see are jagged microblocks.
For simpler understanding, a good analogy would be SRS WOW effect at the max on a low-quality MP3, or, less accurately, turning up the treble/bass till it distorts into boominess and high-harsh. It's good, but unatural.
So the moral of the story is, always experiment and get something to your own liking.
Even 2-2-1 gives visible noise. But this is the best compromise I've tried, just that slight little increase in noise for that subtle but relatively significant increase in sharpness.
2. I refer to the guide where I change the resolution to that of the screen such that the subtitles will appear in the black bar area. Turns out there is a much simpler way to do this. And hence I apologize for the less correct method in my guide.
Under FFDShow's decoder settings, there is this Subtitles settings. Just check Letterbox and set the aspect ratio to the same as that of your screen. Done.
3. You can use CoreAVC/RealAlternative/watever thing in conjunction with FFDShow/CCCP's filters. Just enable Raw Video under the codecs. Thanks to simplyadvanced (VRZ) for pointing that out.
4. Aside from Lanczos, try Spline resize if you're upscaling by large multiples. It's supposed to be better than Lanczos for its lower ringing especially when upscaling by large multiples, and yes it is indeed better than Lanczos in this aspect. But the speed impact may make it unusable for normal playback. Use at personal preference.
Saturday, March 15, 2008
Restoring The Quality Of Cartoon/Anime Videos: Part II
Add: Summary: Just use MSU Smart Deblocking, MSU Cartoon Restore, Resize, Sharpen filters in this particular order.
I recommend Insane Artifect Reduction and 48-60 for sharpen for very noisy/blur videos, and Strong Artifect Reduction and 24 for a balanced improvement. Try Medium and 12 if you just want that subtle improvement without any visible side effect.
FYI, the pictures you see in this guide have been treated with Insane Artifect Reduction and sharpen by 48. The side effect is not so visible in still pictures, but can be seen more clearly in the actual video. Since in "enhancement", we aim to improve/restore the quality of the video without visible side effects, that's why you should also try the Strong/24 setting.
(If this part really came before Part Ia, the intro would be "Part Ia presented us with an interesting conclusion: that the MSU Cartoon Restore filter is close-to-useless or useless or even counter-productive when used with a source that is too clean with too much details. The main problem here is the lack of noise to reduce and the drop in sharpness. Now lets see what happens when we apply the sharpness filter which also introduces more noise in the process for the restore filter to reduce. Two filters that act on each others' side effects, will the outcome be overall better or even worse?")
I was in the shower, thinking that this works with varying degree depending on how bad the source is - poorer sources will see more noticable improvement. And since this works by reducing ringing and other edge noises and such, after all of these is removed, or rather, it would be possible to reduce this artifect totally leaving a "pefect" quality product.
But the quality of the video can only be improved by reducing artifecting; the sharpness remains the same (reduced slightly actually), and it has always been the determining factor in many current-day high-quality encodes.
So I thought, archerly hor... ("actually" in Singlish (Singaporean English)), I can apply a sharpen filter, then apply this Cartoon Restore filter to remove the sharpening artifects at the edges. Smart, isn't it?
Well now, I need to get ready to book in back to camp. But now you have an idea what I'm going to do, so stay tuned! :D
(But a teaser: It's good. And it looks to be an alternative to warpsharp, maybe even the replacement :))
Ok, continue...
Source #1 this time is Lucky Star OP (a.f.k.). The reason this clip came to my head immediately was because I've compared an upscaled-sharpened Chinese version of it versus the a.f.k. release, and the Chinese version does appear better at first but after resizing-sharpening, a.f.k. still won.
Now, lets reduce the artifects that's been keeping us from applying sharpening.
Resize only

Resize + Sharpen (strength 48)

Resized + Sharpen + Restore

As can be seen, the sharpening produces quite a bit of unwanted noise. The restore manages to reduce a lot of these noise at the expensive of a bit of sharpness, but the quality is on the whole better than just resize.
Now lets look at a more complicated picture.
Here, sharpening is important and produces a big improvement over resizing only. However, the amount of noise produced is proportional to the improvement of sharpness.
Resize only

Resize + Sharpen

Resize + Sharpen + Restore

Lose a bit of sharpness but lose a lot of sharpening artifects. That's just great. It's amazing how this filter reduces so much edge noise while not reducing sharpness by too much.
I also looked into whether it's better to do the restore or sharpening first. Do I create the noise first then reduce it later, or reduce potential noise before the sharpening? Lets see which is better.
Resize + Restore first + Sharpen

Not much of a difference. But to me restoring first gives just that slightly sharper and cleaner picture. Can you see the difference and do you have the same opinion as me?
Update: While looking at source #2 I found a scene that shows applying the Cartoon Restore filter first before the sharpen filter results in better quality:
Sharpen + Restore

Restore + Sharpen

Verdict: Applying MSU Cartoon Restore filter in this case has nothing to lose and everything to gain, sharper and cleaner pictures.
Part IIa
(So labelled as Part IIa for two reasons: It's a continuation of Part Ia, and it's after PartII)
I'm going to keep it brief since y'all should already know what I'm going to find out and what I'm going to do, so the pic:

Ahhhh, now that's the way to go. Pic 2a (original) for comparison is below in Part Ia in case you've forgotten.
Only one pic is needed, since it can already be guessed that sharpening + restoring (restoring + sharpening to be precise) yields overall better picture quality. This one just acts as a confirmation (and if acting as counter-evidence, just one is enough).
Verdict #2a: See above
BTW I also found out something else interesting (and explains a mystery I came across when encoding the video in Part I):
Do not apply the MSU Deblocking filter (or possibly any other deblocking filter) after the MSU Cartoon Restore filter since it introduces more noise; apply it before the Cartoon Restore filter instead
Also, applying resizing after everything else gives a slightly sharper and noisier picture. Which (putting it before or after) is better I'm not so sure yet and may even boil down to personal preference, but I recommend doing it after. Reasons being that 1) well, it's sharper, 2) it's better to reduce the noise before doing anything that will increase it as shown in previous cases, and 3) the effect of Cartoon Restore decreases as resolution increases, up till a point where it's next to useless when used on a picture that's been resized for printing from a small and bad-quality original.
And putting sharpen after resize is quite logical, since there's more pixels to work with and hence the aliasing effect is reduced, and the lines can become thinner and noise smaller and hence less obvious.
I recommend Insane Artifect Reduction and 48-60 for sharpen for very noisy/blur videos, and Strong Artifect Reduction and 24 for a balanced improvement. Try Medium and 12 if you just want that subtle improvement without any visible side effect.
FYI, the pictures you see in this guide have been treated with Insane Artifect Reduction and sharpen by 48. The side effect is not so visible in still pictures, but can be seen more clearly in the actual video. Since in "enhancement", we aim to improve/restore the quality of the video without visible side effects, that's why you should also try the Strong/24 setting.
(If this part really came before Part Ia, the intro would be "Part Ia presented us with an interesting conclusion: that the MSU Cartoon Restore filter is close-to-useless or useless or even counter-productive when used with a source that is too clean with too much details. The main problem here is the lack of noise to reduce and the drop in sharpness. Now lets see what happens when we apply the sharpness filter which also introduces more noise in the process for the restore filter to reduce. Two filters that act on each others' side effects, will the outcome be overall better or even worse?")
I was in the shower, thinking that this works with varying degree depending on how bad the source is - poorer sources will see more noticable improvement. And since this works by reducing ringing and other edge noises and such, after all of these is removed, or rather, it would be possible to reduce this artifect totally leaving a "pefect" quality product.
But the quality of the video can only be improved by reducing artifecting; the sharpness remains the same (reduced slightly actually), and it has always been the determining factor in many current-day high-quality encodes.
So I thought, archerly hor... ("actually" in Singlish (Singaporean English)), I can apply a sharpen filter, then apply this Cartoon Restore filter to remove the sharpening artifects at the edges. Smart, isn't it?
Well now, I need to get ready to book in back to camp. But now you have an idea what I'm going to do, so stay tuned! :D
(But a teaser: It's good. And it looks to be an alternative to warpsharp, maybe even the replacement :))
Ok, continue...
Source #1 this time is Lucky Star OP (a.f.k.). The reason this clip came to my head immediately was because I've compared an upscaled-sharpened Chinese version of it versus the a.f.k. release, and the Chinese version does appear better at first but after resizing-sharpening, a.f.k. still won.
Now, lets reduce the artifects that's been keeping us from applying sharpening.
Resize only

Resize + Sharpen (strength 48)

Resized + Sharpen + Restore

As can be seen, the sharpening produces quite a bit of unwanted noise. The restore manages to reduce a lot of these noise at the expensive of a bit of sharpness, but the quality is on the whole better than just resize.
Now lets look at a more complicated picture.
Here, sharpening is important and produces a big improvement over resizing only. However, the amount of noise produced is proportional to the improvement of sharpness.
Resize only

Resize + Sharpen

Resize + Sharpen + Restore

Lose a bit of sharpness but lose a lot of sharpening artifects. That's just great. It's amazing how this filter reduces so much edge noise while not reducing sharpness by too much.
I also looked into whether it's better to do the restore or sharpening first. Do I create the noise first then reduce it later, or reduce potential noise before the sharpening? Lets see which is better.
Resize + Restore first + Sharpen

Not much of a difference. But to me restoring first gives just that slightly sharper and cleaner picture. Can you see the difference and do you have the same opinion as me?
Update: While looking at source #2 I found a scene that shows applying the Cartoon Restore filter first before the sharpen filter results in better quality:
Sharpen + Restore

Restore + Sharpen

Verdict: Applying MSU Cartoon Restore filter in this case has nothing to lose and everything to gain, sharper and cleaner pictures.
Part IIa
(So labelled as Part IIa for two reasons: It's a continuation of Part Ia, and it's after PartII)
I'm going to keep it brief since y'all should already know what I'm going to find out and what I'm going to do, so the pic:

Ahhhh, now that's the way to go. Pic 2a (original) for comparison is below in Part Ia in case you've forgotten.
Only one pic is needed, since it can already be guessed that sharpening + restoring (restoring + sharpening to be precise) yields overall better picture quality. This one just acts as a confirmation (and if acting as counter-evidence, just one is enough).
Verdict #2a: See above
BTW I also found out something else interesting (and explains a mystery I came across when encoding the video in Part I):
Do not apply the MSU Deblocking filter (or possibly any other deblocking filter) after the MSU Cartoon Restore filter since it introduces more noise; apply it before the Cartoon Restore filter instead
Also, applying resizing after everything else gives a slightly sharper and noisier picture. Which (putting it before or after) is better I'm not so sure yet and may even boil down to personal preference, but I recommend doing it after. Reasons being that 1) well, it's sharper, 2) it's better to reduce the noise before doing anything that will increase it as shown in previous cases, and 3) the effect of Cartoon Restore decreases as resolution increases, up till a point where it's next to useless when used on a picture that's been resized for printing from a small and bad-quality original.
And putting sharpen after resize is quite logical, since there's more pixels to work with and hence the aliasing effect is reduced, and the lines can become thinner and noise smaller and hence less obvious.
Restoring The Quality Of Cartoon/Anime Videos: Part Ia
How this part came about:
Actually, I was trying to see what happens with a different type of video in Part II, but apparently I forgot to use the sharpen filter, hence that whole part which I already completed became totally useless. In order to not let it go to waste, I decided to make a Part Ia. Anyway the findings are interesting, because it contradicts with what you've seen in Part I. And seems to make all the parts flow together nicely (and would've if I'm not truthful about how part II came about).
Continuing from Part I...
So everything is all rosy huh? At least that's what I thought before deciding to use this restore on my favourite clips to see if I can get more quality and hence enjoyment out of them. Unfortunately...
Source #2
Pics before words:
The upper pic is the original, the lower pic is the restored:


Before you ask anything, yes I used lossless compression on the output file. The edges are more jagged, and yet it appears softer with less details (and noise). Does this count as better quality? Different people will have different preferences, but I'm having mixed feelings about this. Because, when played back, the restored one does look slightly cleaner, but there's also slightly less details, plus the jaggedness of the edges is visible.
So what went wrong here? One thing for sure is that the effect of this filter is negligible if using a good source. (But "good" is debatable, and this isn't exactly the cleanest nor sharpest video of this era) And we all know using enhancements generally reduces the quality (even though it may look subjectively more pleasing), hence using a filter to correct a problem that isn't too bad will bring more quality drop than quality improvement. But still, there's the strange issue of more jagged edge together with softer lines that awaits to be explained, since jagged edge is usually the product of sharpening, while softer lines are the result of noise removal and resizing.
And secondly, one definitely cannot treat Anime like cartoons (at least, in general, and for both); the lines are too thin to be processed properly resulting in the jaggedness and softening, and there are too many (small) objects/effects that are of not too contrasting colors and without edges, which tend to get covered up by the restore filter. Basically, throw in anything with too much details and everything screws up. (back to above point regarding Anime vs cartoon "in general") That's why this thing is called Cartoon Restore filter.
This should explain why the lines became jagged and yet the picture feels soft. The edges of the lines were supposed to be the result of anti-aliasing and contains useful detail, yet the restore filter regarded them as noise and removed them, causing the jaggedness. The thinner lines are even regarded as noise, or because there is too much noise surrounding the thinner lines, hence they are removed or greatly reduced.
Further AAR (After-Action-Review), perhaps using Insane Artifect Reduction is too much, but on second thought the overall effect is still negligible. So another conclusion:
Verdict #2: The MSU Cartoon Restore filter is close-to-useless or useless or even counter-productive when used with a source that is too clean with too much details
So what if I apply to it the sharpen filter which will bring out all the edge noise?
Continued in the second part of Part II. :P
Actually, I was trying to see what happens with a different type of video in Part II, but apparently I forgot to use the sharpen filter, hence that whole part which I already completed became totally useless. In order to not let it go to waste, I decided to make a Part Ia. Anyway the findings are interesting, because it contradicts with what you've seen in Part I. And seems to make all the parts flow together nicely (and would've if I'm not truthful about how part II came about).
Continuing from Part I...
So everything is all rosy huh? At least that's what I thought before deciding to use this restore on my favourite clips to see if I can get more quality and hence enjoyment out of them. Unfortunately...
Source #2
Pics before words:
The upper pic is the original, the lower pic is the restored:


Before you ask anything, yes I used lossless compression on the output file. The edges are more jagged, and yet it appears softer with less details (and noise). Does this count as better quality? Different people will have different preferences, but I'm having mixed feelings about this. Because, when played back, the restored one does look slightly cleaner, but there's also slightly less details, plus the jaggedness of the edges is visible.
So what went wrong here? One thing for sure is that the effect of this filter is negligible if using a good source. (But "good" is debatable, and this isn't exactly the cleanest nor sharpest video of this era) And we all know using enhancements generally reduces the quality (even though it may look subjectively more pleasing), hence using a filter to correct a problem that isn't too bad will bring more quality drop than quality improvement. But still, there's the strange issue of more jagged edge together with softer lines that awaits to be explained, since jagged edge is usually the product of sharpening, while softer lines are the result of noise removal and resizing.
And secondly, one definitely cannot treat Anime like cartoons (at least, in general, and for both); the lines are too thin to be processed properly resulting in the jaggedness and softening, and there are too many (small) objects/effects that are of not too contrasting colors and without edges, which tend to get covered up by the restore filter. Basically, throw in anything with too much details and everything screws up. (back to above point regarding Anime vs cartoon "in general") That's why this thing is called Cartoon Restore filter.
This should explain why the lines became jagged and yet the picture feels soft. The edges of the lines were supposed to be the result of anti-aliasing and contains useful detail, yet the restore filter regarded them as noise and removed them, causing the jaggedness. The thinner lines are even regarded as noise, or because there is too much noise surrounding the thinner lines, hence they are removed or greatly reduced.
Further AAR (After-Action-Review), perhaps using Insane Artifect Reduction is too much, but on second thought the overall effect is still negligible. So another conclusion:
Verdict #2: The MSU Cartoon Restore filter is close-to-useless or useless or even counter-productive when used with a source that is too clean with too much details
So what if I apply to it the sharpen filter which will bring out all the edge noise?
Continued in the second part of Part II. :P
Saturday, March 8, 2008
Restoring The Quality Of Cartoon/Anime Videos/Pictures With MSU Cartoon Restore Filter
I was making some PSP "Logitech" Playgear skins when I noticed that one of my pictures has too much noise. To be precise, JPEG compression artifects. I remember seeing a guide on how to take a bad quality, low res. picture found on the net and restore it to a decent quality good enough to be used as DVD cover. It involved VirtualDub and some kind of Power Rangers, but I couldn't find it anymore when I needed it, so if you know where this is, drop me a message. I'd be grateful.
But as I was looking for it, I came across another solution that works. No not those kind of bogus $20-100 software that either does nothing or has too much undesirable effects, and are basically some inferior common programming repackaged and sold for daylight robbery prices. It's by MSU. MSU stands for Moscow State University, their Graphics & Media Lab (Video Group) to be exact. They are a bunch of geniuses that study digital video compression and such, create filters (lots of it), and even have their own lossless codec. Their filters are usually very good, and they even improved on x264, their improved version available for download on their homepage at http://www.compression.ru/index_en.htm.
Today I'll be talking about the MSU Cartoon Restore filter, which I used to restore the quality of my bad JPEG picture. It works, with a great degree of success, unlike other solutions out there as I've mentioned above.
The page is here.
The reason it works is because it only works on cartoons/Anime. Basically high contrast and sharp edges. Understanding how cartoon/Anime works, all the code needs to do that's different from the normal one, is to detect huge similar patches of colors and the thick black lines, and be more merciless at destroying the minute data that we call "noise". It would've sounded easy to the pros out there and should've been created long ago, why is it that only MSU created the actual product that's going to be so useful to Otakus?
Ok, enough with the talking, "a little less conversation a little more action please".
This is the pic I wanted to restore:

This is after restoration:

After resizing for printing, a close up reveals the differences:

That is pretty good. I used the Fuzzy Adaptive Filter because 1) The Insane Artifect Reduction has better results than Multipass Bilateral Filter at the preset settings, and 2) Attempts to use insane custom settings with the Multipass Bilateral Filter makes my com feel so slow as if it crashed. (The Fuzzy Adaptive Filter is slow already - brings my encoding rate to less than half of real-time with HuffYUV. Otherwise, for that kind of source, it'd be at least a 100fps and ~150 on average. A 320x240 source btw, god knows what happens with full SD or even HD resolution)
But it (the speed impact) just shows how complicated this filter is, and how it's going to be good. :D
On their website, Multipass Bilateral Filter is the best, but they are the pros that know how to tweak the settings, while I'm just a small kid with a slow com. I take what I can get.
I also tried my own Insane Artifect Reduction settings, which is 1.5x higher in everything compared to the original Insane Artifect Reduction. But it softened the picture too much while reducing only a bit more artifecting, so it definitely is not at optimal. The makers probably knew that, hence their Insane Artifect Reduction is not too insane.
Ok, it's so good, why not I use it to try to restore the quality of a YouTube video I have on hand?
So I launched VirtualDub again, Fuzzy Adaptive Filter - Insane Artifect Reduction. Results are pleasing. Definitely more watchable. A bit of blocking is also removed. But the larger macroblocks are left untouched.
So I decided to bring in MSU Smart Deblocking filter. It's THE deblocking filter for noobs. I know that their standard deblocker filter as well as that of ffdshow have more settings to tweak, but just with the simplest settings MSU Smart Deblocking yields the best results. And since MSU is saying that the "smart" version is better in their own comparison on the "smart"'s page, lets believe the pros.
After two filters and a massive speed slowdown, the result is... impressive. Now instead of a YouTube video, it looks more like a poorly ripped and encoded sub of a show in the 1990s. Not the best, but definitely more pleasing.
(Pictures in this order from left to right - original, w/MSU Cartoon Restore ilter, w/MSU Cartoon Restore and MSU Smart Deblocking filters)
BTW - if you know what this video is, well good, welcome to the same world as me. :D If not, it's better if you don't know what it is.
P.S. I like the song, one of my fav at all times. And if you have the video or better quality version of the full-length song please contact me. Also, if you want the "not the best but still decent" quality of the full-length song can contact me too. :)
Update: Ok I already got the song in FLAC and the original MPEG movie which is 7mbps. Anyone wants can contact me. :D
 This is one of the best scenes in the source already, and the filters manage to make it look even better.
Now lets look at the worse scenes.
 Deblocking starts to become important


 I didn't know it is possible to get so much data out of this frame by deblocking
Ey wait, wasn't I supposed to be looking at the MSU Cartoon Restore filter and not the Smart Deblocking filter? Oops.
There are a lot more pictures I want to show you, but that would take too much of my time and make this post too long. Anyway the conclusion is obvious. The MSU Cartoon Restore filter works like a charm. The Smart Deblocking filter works too. And together, they can change poor YouTube quality videos into something more watchable.
Ok... the sharper eyes have noticed that this guide is about "Restoring The Quality Of Cartoon/Anime Videos/Pictures With MSU Cartoon Restore Filter". Now, I definitely talked about restoring the quality of pictures (and have done so above), and MSU Cartoon Restore filter is a video filter for use in AVISynth and VirtualDub. How did I use a video filter on a picture?
This post is another double-guide (as in like the multi-guide of some of my previous posts, meaning more than one guide in a post, literally). The other important part required to make the above work, is knowing how to open pictures in VirtualDub.
It's not hard actually. Just make sure your picture is in a common picture format, make one copy of it and place it in the same directory, rename them such that they end with "1" (or 2 and 3 and 4... for more pictures in the image sequence). Open the first one in VirtualDub, and the rest of the images in the sequence will be opened as though they were together in a video file. This trick may occasionally become useful in video editing.
After opening the picture in VirtualDub, you can now use the many filters that are available for VirtualDub to do interesting and useful things.
That's the end of this guide. Hope it will be useful to you, someday. :D
But as I was looking for it, I came across another solution that works. No not those kind of bogus $20-100 software that either does nothing or has too much undesirable effects, and are basically some inferior common programming repackaged and sold for daylight robbery prices. It's by MSU. MSU stands for Moscow State University, their Graphics & Media Lab (Video Group) to be exact. They are a bunch of geniuses that study digital video compression and such, create filters (lots of it), and even have their own lossless codec. Their filters are usually very good, and they even improved on x264, their improved version available for download on their homepage at http://www.compression.ru/index_en.htm.
Today I'll be talking about the MSU Cartoon Restore filter, which I used to restore the quality of my bad JPEG picture. It works, with a great degree of success, unlike other solutions out there as I've mentioned above.
The page is here.
The reason it works is because it only works on cartoons/Anime. Basically high contrast and sharp edges. Understanding how cartoon/Anime works, all the code needs to do that's different from the normal one, is to detect huge similar patches of colors and the thick black lines, and be more merciless at destroying the minute data that we call "noise". It would've sounded easy to the pros out there and should've been created long ago, why is it that only MSU created the actual product that's going to be so useful to Otakus?
Ok, enough with the talking, "a little less conversation a little more action please".
This is the pic I wanted to restore:

This is after restoration:

After resizing for printing, a close up reveals the differences:

That is pretty good. I used the Fuzzy Adaptive Filter because 1) The Insane Artifect Reduction has better results than Multipass Bilateral Filter at the preset settings, and 2) Attempts to use insane custom settings with the Multipass Bilateral Filter makes my com feel so slow as if it crashed. (The Fuzzy Adaptive Filter is slow already - brings my encoding rate to less than half of real-time with HuffYUV. Otherwise, for that kind of source, it'd be at least a 100fps and ~150 on average. A 320x240 source btw, god knows what happens with full SD or even HD resolution)
But it (the speed impact) just shows how complicated this filter is, and how it's going to be good. :D
On their website, Multipass Bilateral Filter is the best, but they are the pros that know how to tweak the settings, while I'm just a small kid with a slow com. I take what I can get.
I also tried my own Insane Artifect Reduction settings, which is 1.5x higher in everything compared to the original Insane Artifect Reduction. But it softened the picture too much while reducing only a bit more artifecting, so it definitely is not at optimal. The makers probably knew that, hence their Insane Artifect Reduction is not too insane.
Ok, it's so good, why not I use it to try to restore the quality of a YouTube video I have on hand?
So I launched VirtualDub again, Fuzzy Adaptive Filter - Insane Artifect Reduction. Results are pleasing. Definitely more watchable. A bit of blocking is also removed. But the larger macroblocks are left untouched.
So I decided to bring in MSU Smart Deblocking filter. It's THE deblocking filter for noobs. I know that their standard deblocker filter as well as that of ffdshow have more settings to tweak, but just with the simplest settings MSU Smart Deblocking yields the best results. And since MSU is saying that the "smart" version is better in their own comparison on the "smart"'s page, lets believe the pros.
After two filters and a massive speed slowdown, the result is... impressive. Now instead of a YouTube video, it looks more like a poorly ripped and encoded sub of a show in the 1990s. Not the best, but definitely more pleasing.
(Pictures in this order from left to right - original, w/MSU Cartoon Restore ilter, w/MSU Cartoon Restore and MSU Smart Deblocking filters)
BTW - if you know what this video is, well good, welcome to the same world as me. :D If not, it's better if you don't know what it is.
P.S. I like the song, one of my fav at all times. And if you have the video or better quality version of the full-length song please contact me. Also, if you want the "not the best but still decent" quality of the full-length song can contact me too. :)
Update: Ok I already got the song in FLAC and the original MPEG movie which is 7mbps. Anyone wants can contact me. :D
 This is one of the best scenes in the source already, and the filters manage to make it look even better.
Now lets look at the worse scenes.
 Deblocking starts to become important


 I didn't know it is possible to get so much data out of this frame by deblocking
Ey wait, wasn't I supposed to be looking at the MSU Cartoon Restore filter and not the Smart Deblocking filter? Oops.
There are a lot more pictures I want to show you, but that would take too much of my time and make this post too long. Anyway the conclusion is obvious. The MSU Cartoon Restore filter works like a charm. The Smart Deblocking filter works too. And together, they can change poor YouTube quality videos into something more watchable.
Ok... the sharper eyes have noticed that this guide is about "Restoring The Quality Of Cartoon/Anime Videos/Pictures With MSU Cartoon Restore Filter". Now, I definitely talked about restoring the quality of pictures (and have done so above), and MSU Cartoon Restore filter is a video filter for use in AVISynth and VirtualDub. How did I use a video filter on a picture?
This post is another double-guide (as in like the multi-guide of some of my previous posts, meaning more than one guide in a post, literally). The other important part required to make the above work, is knowing how to open pictures in VirtualDub.
It's not hard actually. Just make sure your picture is in a common picture format, make one copy of it and place it in the same directory, rename them such that they end with "1" (or 2 and 3 and 4... for more pictures in the image sequence). Open the first one in VirtualDub, and the rest of the images in the sequence will be opened as though they were together in a video file. This trick may occasionally become useful in video editing.
After opening the picture in VirtualDub, you can now use the many filters that are available for VirtualDub to do interesting and useful things.
That's the end of this guide. Hope it will be useful to you, someday. :D
Subscribe to:
Posts (Atom)
